

Rules & Strategies
NOTE: The following is based on my particular game set to replay mode with mostly factory game adjustments. Results may vary. Many consider Elvira to be a somewhat shallow game. Yet there are so many cross interactions among the various features that this turned into a rather lengthy rules page.
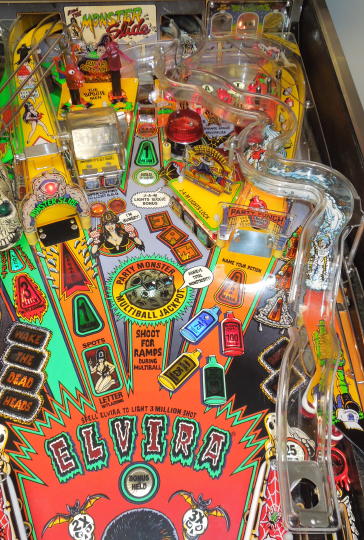
BAT Lanes: The BAT Lanes consist of three rollover lanes below a mini top arch at the upper right corner of the playfield. The "A" lane looks like Achmed the Dead Terrorist. The BAT Lanes are accessed by a plunger shot or by a shot up the Pizza Passage (right orbit) or from the Top Eject Hole. Each rollover scores 10k points lit or unlit. Completing the BAT Lanes scores an additional 40k points. Completing the BAT Lanes also increments the end of ball bonus multiplier up to 5x. The end of ball bonus multiplier is indicated by skull inserts in the lower middle area of the playfield. After the multiplier is maxed out at 5x, additional completions of the BAT Lanes progressively award points from 70k points up to 150k points. I never make it that far. Completing the BAT Lanes also lights the Monster Slide Ramp to spot an ELVIRA letter and lights lock (one ball lock per lock lit). Lit BAT Lanes are carried from ball to ball. Since lane change is always available, there is no skill shot per se. As with most pinball machines, you get your ball back if you manage to drain without scoring any points. On Elvira this is pretty easy to do. If you miss the BAT Lanes, the ball will roll back down the Pizza Passage scoring no points. In that event it's best to let the ball drain and try again.

BAT Lanes.
Jumper Bumpers: Jumper Bumpers are like regular bumpers except the bumper cap is attached to the rod and ring assembly and jumps accordingly. Neat! I believe Elvira was the first game to feature Jumper Bumpers. Note that the game manual incorrectly specs a conventional rod and ring assembly. Each Jumper Bumper lamp is controlled as opposed to simply tied to a GI circuit which is also neat. A trio of Jumper Bumpers is located immediately below the BAT Lanes. Balls exit the Jumper Bumpers from above the JAM Drop Targets or to the Pizza Passage. Each bumper hit scores the odd value of 3,010 points. Each bumper hit adds 1k points to the Boogie Bonus when lit. Jumper Bumper hits also toggle the outlanes and Monster Slide Ramp when lit for Special.

Jumper Bumpers.
Flip Up Targets and BAR-B-Q Bonus: The Flip Up Targets are located to the right of the Monster Slide Ramp entrance and comprise a pair of coffin-like targets. I believe this Flip Up Target mechanism is unique to Elvira and the Party Monsters. Hitting the target "flips up" the top half of the coffin to reveal its occupant. Elvira (Chief COOK) is on the left. Drac (Chief KOOK) is on the right. Flipping the targets requires a reasonably solid hit. Soft shots won't do it. Flipping both targets lights the Top Eject Hole to collect the BAR-B-Q Bonus. BAR-B-Q Bonus awards are indicated on the BAR-B-Q grill at the lower right corner of the backglass. Possible random awards include Extra Ball, end-of-ball bonus multiplier, ELVIRA letter, mystery score or Special. The backglass lights aren't that useful. It's easier to just watch the display to see your award. Note that the BAR-B-Q Bonus is lit at the beginning of each game. Completing the Flip Up Targets is required to relight the BAR-B-Q Bonus after it's collected. A lit BAR-B-Q Bonus carries from ball to ball. The Flip Up Targets do not carry and are reset at the beginning of each ball and after the BAR-B-Q Bonus is collected. There is a red stationary target behind the lower portion of each Flip Up Target. Each red target hit scores 2k points if its corresponding Flip Up Target is un-flipped. Each red target hit scores 3k points if its corresponding Flip Up Target is flipped. Each red target hit scores 20k points if both Flip Up Targets are flipped. Successfully flipping one Flip Up Target scores an additional 10k points. Successfully flipping the other Flip Up Target scores an additional 50k points and lights the Top Eject Hole for the BAR-B-Q Bonus.
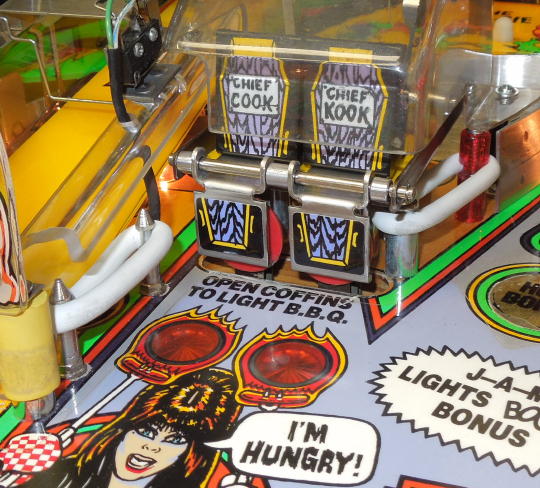
Un-flipped Flip Up Targets.
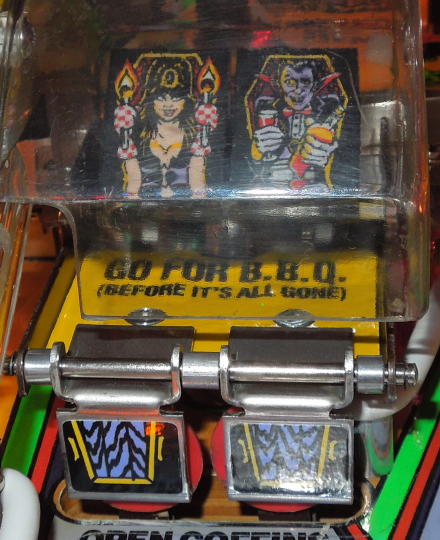
Flipped Flip Up Targets.

BAR-B-Q Bonus on the backglass.
Top Eject Hole: Shots to the Top Eject Hole can be risky. If the ball doesn't make the hole, it may roll straight down the middle. Landing in the Top Eject Hole collects anything that is lit below the hole including the Boogie Bonus, the BAR-B-Q Bonus, 1 Million and Hold Bonus. The Boogie Bonus is lit via the JAM drop targets. The BAR-B-Q Bonus is lit via the Flip Up Targets. The 1 Million is lit via the Dead Heads feature. Hold Bonus is lit via a pair of timed shots to the Monster Slide Ramp. The Top Eject Hole scores 5k points and ejects to the BAT Lanes.

Top Eject Hole passage.
JAM Drop Targets and the Boogie Bonus: The JAM Drop Targets are a bank of three drop targets located in the center of the playfield. Completing the JAM Drop Targets lights the Top Eject Hole for the Boogie Bonus and lights lock (one ball lock per lock lit) and lights the Monster Slide Ramp for an ELVIRA letter. Each target scores 5k points. Completing the bank scores an additional 50k points. When lit, the Boogie Bonus starts at 25k points. The Boogie Bonus increases by 1k points with each Jumper Bumper hit and by 10k points with each additional completion of the JAM Drop Targets. The Boogie Bonus may grow up to 255k points. The Boogie Bonus is collected and reset by landing in the Top Eject Hole. Collecting the Boogie Bonus also momentarily activates the dancing Boogie Men, a finger puppet mechanism located behind the Flip Up Targets. An uncollected Boogie Bonus remains lit and carries from ball to ball. The drop targets are an easy choice when trying to set yourself up for Multiball locks or the 3 Million Skull Passage shot.

JAM Drop Targets.

The Boogie Men.
Skull Passage and Multiball: The Skull Passage is an orbit-like passage occupying the upper left area of the playfield. The entrance to the Skull Passage is easily identified by the cool looking 3D skull with blinking green eyes. The passage leads to an inverted "U" behind the Flip Up Targets where balls are held or locked for three-ball Multiball. When released, balls are launched up a perpendicular metal ramp and (hopefully) fly over the Top Eject Hole passage and into the Jumper Bumper nest.
The number of balls locked is indicated by the green eyes. If one ball is locked, the eyes alternately blink. If two balls are locked, the eyes blink together.
Lock is lit at the beginning of each game. Starting Multiball is as simple as shooting three balls up the Skull Passage. Subsequent Multiballs require lock to be lit before each ball can be locked. Lock may be lit by completing the BAT Lanes or the JAM Drop Targets. A ball shot up the Skull Passage when not lit for lock will be returned to play via the Multiball launch ramp. Balls shot up the Skull Passage always score the odd value of 10,010 points. Technically you get 10 points for the mid-passage "Hahahaha" switch and another 10k points for making it to the end of the lock loop. Weak shots get 20 points as you hit the "Hahahaha" switch on the way up and again on the way back down.
Lock theft is available during a multi-player games.
The object of Multiball is to collect the progressive Jackpot by shooting a ball up each of the Monster Slide Ramp and the Party Punch Ramp. The Jackpot can be collected with two or three balls in play. After collecting the Jackpot, each ramp shot is worth 250k points until Multiball ends. Multiball ends after two of the three balls are lost. The Jackpot starts at 1M points and progressively increases up to 4M points. The Jackpot carries from ball to ball, player to player and game to game and is not reset until collected. The Jackpot tends toward the 1M point end of the scale since it's not that hard to collect.

The Skull Passage.

Lock area behind the Flip Up Targets. Balls kicked up the metal ramp are launched across the playfield to land among the Jumper Bumpers.
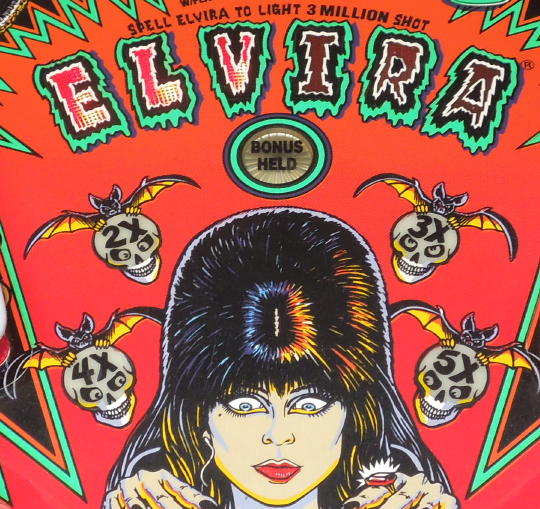
Skull Passage and 3 Million: The Skull Passage can also be shot for 3 Million when lit. The 3 Million is lit by completing the ELVIRA letters shown in the center of the playfield between the slingshots. Each letter is collected by shooting the Monster Slide Ramp when lit. The Monster Slide is lit for an ELVIRA letter by completing the BAT Lanes, the JAM Drop Targets or the Dead Heads Targets. Once lit, the Monster Slide must be shot within 15 seconds to collect the ELVIRA letter. After the A letter is collected the Skull Passage is lit for 3 Million. This is also a timed shot. The Skull Passage must be shot within 20 seconds. Note that collecting the A letter via the Monster Slide will set up the Skull Passage shot. Don't miss. If the 3 Million is collected, all the ELVIRA letters go out. If the 3 Million is not collected, the R and A letters go out. Lit ELVIRA letters carry from ball to ball, player to player and game to game. Aside from the possibility of a large accumulated Multiball Jackpot, the 3 Million shot is the most lucrative shot of the game. And it's not that hard to set up. The JAM Drop Targets are an easy completion to light letters and the Monster Slide/Skull Passage combo is easily doable.
ELVIRA letters.
Monster Slide Ramp: The Monster Slide is a long meandering ramp that begins between the Skull Passage and the Flip Up Targets. The ramp extends around the back of the playfield and down to the right inlane. Shots to the Monster Slide Ramp start at 50k points and progressively increase by 25k point increments. These are timed shots. The ramp shots need not be consecutive, but each shot must be within 15 seconds of the last. Point values reset to 50k if the 15 second window expires before another successful shot. Point values reset to 50k at the beginning of each ball. Two successful ramp shots within 15 seconds light the Top Eject Hole for Hold Bonus. Five successful timed ramp shots score 1 Million. Subsequent successful timed ramp shots award an ELVIRA letter and 250k points. A lit Hold Bonus does not carry from ball to ball.
Scoring 1 Million again on the Monster Slide requires larger sets of successful timed shots. For example, six shots are needed for a second 1 Million score. Seven shots are needed for a third 1 Million score. The number of addition needed shots is remembered from ball to ball.
Shooting the Monster Slide Ramp also collects an ELVIRA letter when lit. The ramp is lit by completing the BAT Lanes, the JAM Drop Targets or the Dead Heads Targets. Once lit, the ramp must be shot within 15 seconds to collect the ELVIRA letter. A shot to the Monster Slide Ramp along with a shot to the Party Punch Ramp is required to collect the Jackpot during Miltiball. The Monster Slide Ramp may also be shot for Special when lit. Special is lit via the Dead Heads feature. A lit Special carries from ball to ball, but may be collected only once. There's a "Cyclops" rollunder switch at the entrance to the Monster Slide Ramp. The switch triggers flashers and call outs, but scores no points.
If two balls are instantaneously shot around the Monster Slide Ramp, you'll get the 500k point Double Slide Bonus. First of all, this is a super difficult shot. Second, there are so many other features in play during Multiball that it's unlikely the display will actually be available to show "Double Slide Bonus 500,000". I only ever saw this by pulling the glass and doing it by hand.

Monster Slide Ramp entrance.
Overview of the Monster Slide Ramp.
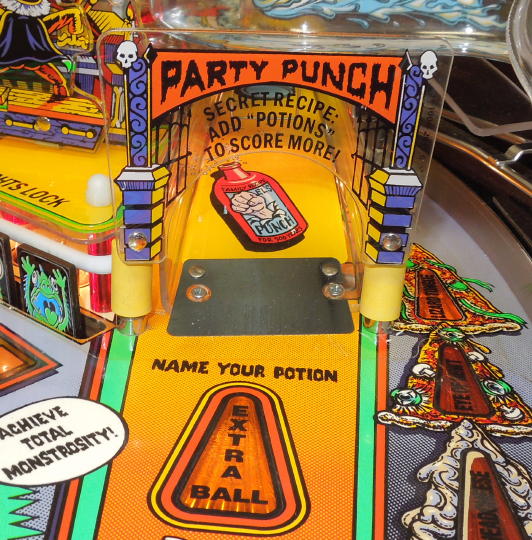
Party Punch Ramp: The Party Punch Ramp entrance is on the right side of the playfield between the JAM Drop Targets and the Pizza Passage. The ramp leads to a vertical up kicker (VUK) in the upper left corner of the playfield. The VUK launches the ball into the habitrail which returns the ball to the left flipper. This arrangement sets up easy consecutive shots to the Party Punch ramp. However, the ramp awards are not timed and consecutive shots are not necessary to advance the awards. Awards increase with each ramp shot in 25k point increments and may be calculated by adding up the lit inserts by the ramp entrance. At the beginning of a game the award starts at 150k points and progressively advances to 175k points, 200k points, 225k points (lit Extra Ball) and finally 250k points (collect Extra Ball). Lit awards are carried from ball to ball. That's only five shots to get the Extra Ball. Easy. After the first Extra Ball is collected the starting award resets to 75k points and the lit awards do not carry from ball to ball. If a second Extra Ball is collected then the award resets to 10k points (no lit inserts) and eleven shots (on the same ball) are needed to collect another Extra Ball. Multiple Extra Balls may be collected on the same ball. I always go for the first Extra Ball, but focus on other features after the first Extra Ball is collected.
A consolation Extra Ball is possible. The Party Punch Ramp lights for Extra Ball on the third ball if the first two balls were poorly played. A shot to the Party Punch Ramp along with a shot to the Monster Slide Ramp is required to collect the Jackpot during Miltiball.
Entrance to the Party Punch Ramp.

Party Punck VUK.
Dead Heads Targets: The Dead Heads Targets are a bank of four stationary targets along the lower left side of the playfield. Each target scores 5k points lit or unlit. Completing the bank scores an additional 20k points and lights the left of three Dead Heads. The Dead Heads are at the back right of the playfield over the Party Punch Ramp. Completing the target bank a second time scores 40k points and lights the middle Dead Head. Completing the bank a third time scores 50k points and lights the right Dead Head. Additional completions progressively score more points up to 200k points. But I almost never make it that far. A sixth completion lights Special at the outlanes and Monster Slide Ramp (an extreme rarity for me). Seventh and subsequent completions score 200k points. A completion of the Dead Heads targets also lights the left inlane for 25k points. The inlane remains lit until the ball in play is lost. A completion of the Dead Heads targets also lights the Monster Slide Ramp for an ELVIRA letter. Lighting the three Dead Heads lights 1 Million at the Top Eject Hole. Lit targets carry from ball to ball. One or two lit Dead Heads carry from ball to ball. Three Dead Heads and the lit 1 Million do not carry from ball to ball. Progressive awards over 40k do not carry from ball to ball. Instead the award resets to 20k at the beginning of the next ball. A lit Special carries from ball to ball, but may be collected only once. I don't pay much attention to this feature unless I notice I'm getting close to setting up the 1 Million shot. There are too may other fun features on the playfield to worry about stationary targets.

Dead Heads stationary targets.

The Dead Heads.
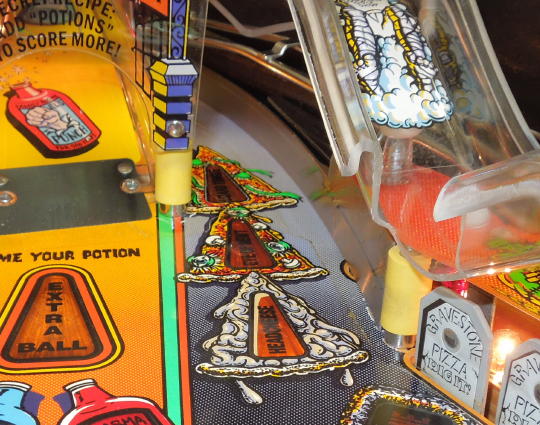
Pizza Targets and Pizza Passage: The Gravestone Pizza Targets are a bank of two stationary targets along the lower right side of the playfield. Each target hit scores 10k points lit or unlit. Completions of the target bank progressively score from 20k points to 200k points in 20k point increments. The progressive point value resets to 20k at the beginning of each ball. A lit target carries from ball to ball. Completions of the target bank also light the right inlane for 25k points. The inlane remains lit until the ball in play is lost.
Completions of the target bank also progressively light awards for the Pizza Passage. The Pizza Passage is the right orbit between the Pizza Targets and the Party Punch Ramp. Awards include Headcheese for 50k points or add Eye of Newt for a total of 100k points or add Lizard Tongue for a total of 150k points. Shooting the Pizza Passage resets the awards. So it's best to light all three pizza toppings before going for the Pizza Passage. The Pizza Passage award is 25k points if nothing is lit. Lit toppings do not carry from ball to ball. The Pizza Passage includes two rollover switches. Both switches are inactive during a plunger shot. They become active after some other switch closure (such as a BAT lane). The mid-passage rollover switch appears to do nothing but score 10 points. The upper rollover switch scores the Pizza Passage award. Or in other words, a successful Pizza Passage shot nets the award plus 10 points. Again, there's too much else going on with this game to worry much about the Pizza features (unless I notice I've lit all the toppings). Anything I score from the Pizza features is usually incidental.

Gravestone Pizza Targets.
Pizza Passage.
Slingshots: The slingshots are of the usual shape and position. Each hit scores 10 points and toggles the outlanes and Monster Slide Ramp when lit for Special
Inlanes: Inlanes score 5k points or 25k points when lit. Lit inlanes remain lit until the ball in play is lost. Lit inlanes do not carry from ball to ball. Left and right inlanes are lit by way of the Dead Heads Targets and Pizza Targets, respectively, as noted above.
Outlanes: Outlanes score 40k points and Special when lit. When lit for Special the outlanes and Monster Slide Ramp are toggled by slingshot and Jumper Bumper hits. A lit Special carries from ball to ball, but may be collected only once.
Flippers: There are two flippers in the usual location. This was the first game I owned with flippers including the Nordman aiming marks. I don't think I've ever consciously used the marks. The first time I noticed this style of flipper was on a Bugs Bunny's Birthday Ball. I assumed the aiming marks were simply to make the flippers look more like carrots. Elvira has no center post.

Lower playfield.
Multiball: Three ball Multiball is by way of the Skull Passage feature as noted above.
Extra Balls: Extra Balls (Party Again) may be earned by way of the Party Punch Ramp as noted above or by way of the BAR-B-Q Bonus as noted above.
End of Ball Bonus: The end of ball bonus may be multiplied up to 5x by way of the BAT Lanes or BAR-B-Q Bonus as noted above. Multiplies reset at the beginning of each ball. Hold Bonus at the Top Eject Hole is lit by a pair of timed loops around the Monster Slide Ramp.
Specials: Specials are by way of the Dead Heads feature or the BAR-B-Q Bonus feature as noted above.
Strategy: At the beginning of a game I focus on locking balls with the right flipper and shooting for the Party Punch Extra Ball with the left flipper. After collecting the Extra ball and exhausting my first Multiball, I shoot for the JAM Drop Targets. The drop targets are an easy shot and light many other features. I most enjoy the Monster Slide/Skull Passage combo shot. When I notice the availability of an ELVIRA letter I stop whatever else I'm trying to do and shoot for the Monster Slide. The Monster Slide sets up a shot to the Skull Passage for another lock. The most satisfying scenario is shooting the Monster Slide for the A letter and then immediately hitting the Skull Passage for 3 Million and the start of another Multiball.
Vocabulary:
(E) = Elvira; (D) = Drac; (C) = Cyclops;
(S) = Skull; (W) = Wolfman
"Hey let's party!"(E) - Start of Game
"Don't touch me there!"(E) - Start Button without Credits
"Now we're cookin'"(E) - Un-Flipped Flip-Up Target
"Oh deja vu"(E) - Un-Flipped Flip-Up Target
"Good Evening"(D) - Un-Flipped Flip-Up Target
"Don't touch me there!"(E) - Flipped Flip-Up Target
"Blah"(D) - Flipped Flip-Up Target
"Hahahaha"(S) - Skull Passage
"Lights; Organ"(D) - Start Multiball; Part 1
"Ooh nice organ!"(E) - Start Multiball; Part 2
"Party!"(W) - Start Multiball; Part 3
"Head for the cauldron!"(E) - After Left Ramp Shot during Multiball
"Quick, to the Monster Slide!"(D) - After Right Ramp Shot during Multiball
"Ooh jackpot!"(E) - Jackpot; Part 1
"Get down, get funky!"(D) - Jackpot; Part 2
"How 'bout another ball?"(E) - Extra Ball Serve
"Oh yeah!"(E) - Monster Slide
"Oh yeah!"(C) - Monster Slide
"Oh no"(C) - Failed Monster Slide
"Let's boogie!"(E) - Start Boogie Men Toy
"Thank you boys"(D) - End Boogie Men Toy
"Quick, to the cave!"(D) - To Skull Passage for 3 Million
"Ooh Monstrous!"(E) - 3 Million
"Party pooper"(E) - Drain
"Oh deja vu"(E) - Enter Initials
"Ooh Monstrous!"(E) - Match
"Hey let's party!"(E) - Random Attract
"Hahahaha"(S) - Random Attract
"Get down"(D) - Random Attract
"Blah"(D) - Random Attract
I've listed five different voices above which may be debatable. Elvira, Drac and the Skull are pretty obvious. The two calls I'm citing as Cyclops are both associated with the Monster Slide ramp switch directly behind the Cyclops plastic. I don't actually know what a Cyclops sounds like, but it seems like a reasonable association. The one call I'm citing as Wolfman sounds different from the other four voices and includes a bit of a howl; kind of a Wolfman-like howl.