

Rules & Strategies
NOTE 1: The following is based on my particular game with all adjustments set to factory defaults. Results may vary.
NOTE 2: Some parameters are approximate. Asterisk (*) denotes an initial game setting. These settings are dynamically adjusted by the cpu according to predetermined award percentages.
Vortex Skill Shot: Each ball begins with a plunger skill shot to the Vortex, an orange spiral in the upper right corner of the playfield. The plunger spring is stiff, but a strong shot is required to get the ball up the spiral. The spiral has three holes worth 5k, 100k and 20k points from bottom to top. The middle 100k hole is the most difficult to make, but with a little practice it can be made with fair consistency. The Vortex score is multiplied by the number of intermediate balls shot into the Vortex from 1x to 10x. "Intermediate" refers to any ball that does not advance the ball-in-play count. Extra balls are intermediate balls. A ball served after a lock is an intermediate ball. Balls that fall into the plunger lane from the upper mini-playfield are intermediate balls. In theory, 1M points can be scored if the 100k hole is hit on the tenth intermediate ball. After the tenth intermediate ball the multiplier resets to 1x. More typically, the multiplier resets at the beginning of balls 1, 2 and 3. Balls exit the Vortex near the top of the Jet Bumper area. No Vortex points are scored if a ball fails to make the first 5k point Vortex hole. Instead, the ball rolls halfway back down the plunger lane and bounces off a one-way gate near the bottom of the Jet Bumper area.
I have never made the 1M point skill shot. I set it up only once, but missed the final plunge.
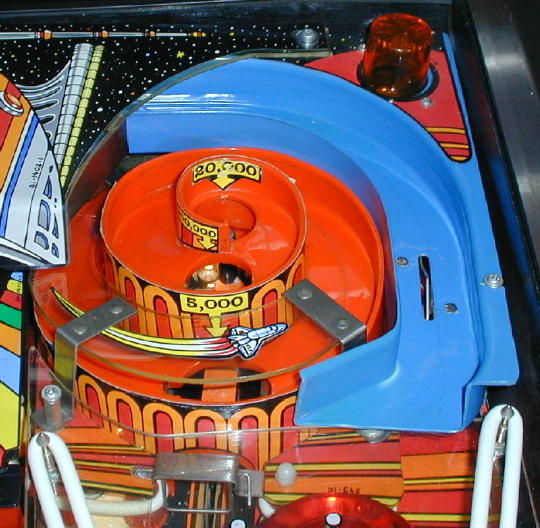
The Vortex.
Jet Bumpers and the Energy Value: Three Jet Bumpers are located at the middle right side of the playfield. The Jet Bumpers can be accessed from the Vortex, plunger lane, upper mini-playfield and from the main playfield above and below the right-side 5-target bank. Balls remain in the Jet Bumper area until bounced out to the main playfield from around the top and bottom of the right-side 5-target bank. Every hit on a Jet Bumper scores 1k points and increases the "Energy Value" by 2k points. The Energy Value carries over from ball-to-ball and has minimum and maximum values of 50k and 500k points. The Energy Value is collected by hitting the left-side flashing drop target which raises the ramp and exposes an under-ramp stationary target to collect the Energy Value. The stationary target remains exposed for 15* seconds before the ramp comes back down.
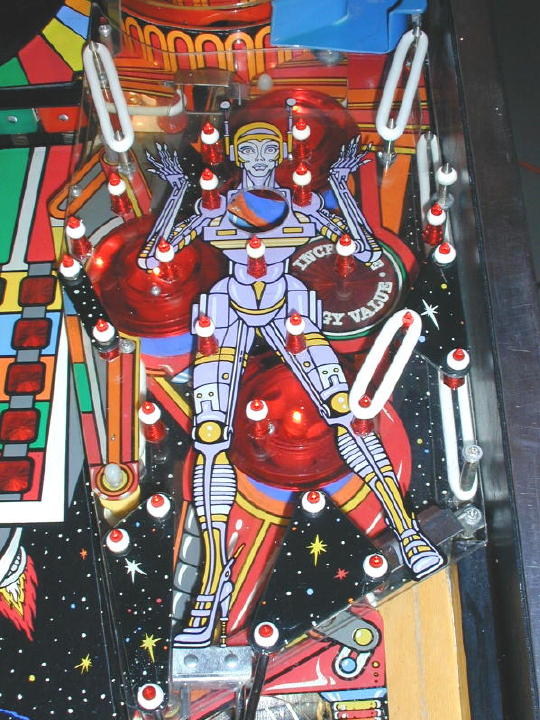
The Jet Bumper area.
The drop targets and raised ramp.
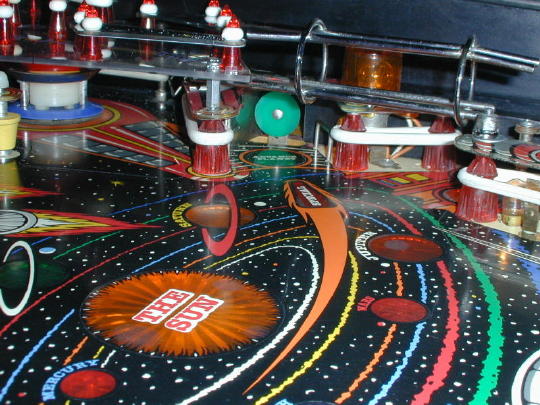
Ramp and the Solar Value: The ramp orbits the very top of the playfield from left to right. The ramp entrance is near the upper left of the playfield between the drop target bank and the single upper left eject hole. The ramp exits onto the upper mini-playfield located above the Jet Bumper area. Each ramp shot scores 1k points. Each ramp shot also increase the end-of-ball bonus multiplier. The current value of the multiplier is displayed within a satellite image located in the middle lower playfield. Each ramp shot also increases the "Solar Value" by 50k points. The Solar Value starts at 100k points and may be increased to a maximum of 5M points. The Solar Value carries over from ball-to-ball, player-to-player and game-to-game until collected. The Solar Value is collected by shooting the ramp during Multi-Ball. Specifically, one ball must first be relocked. Then the ramp lights and the Solar Value is collected by shooting the ramp with the other ball. Note that the ramp has one rollover switch near its entrance and one at its exit. The ball must fully traverse the ramp and hit the exit switch to activate the aforementioned features. The entrance switch merely scores 10 points, toggles lit extra balls and triggers a sound effect.
The ramp.
The satellite.
Upper Mini-Playfield: The upper mini-playfield is a passive bagatelle-type platform studded with posts and rubbers and offers no direct scoring potential. Balls enter the mini-playfield byway of the ramp. The ball usually falls through a center hole and lands between the Jet Bumpers. The ball may also roll off into the center of the main playfield or the ball may roll off into the plunger lane or into the right inlane via a short wire-form ramp.
The mini-playfield.
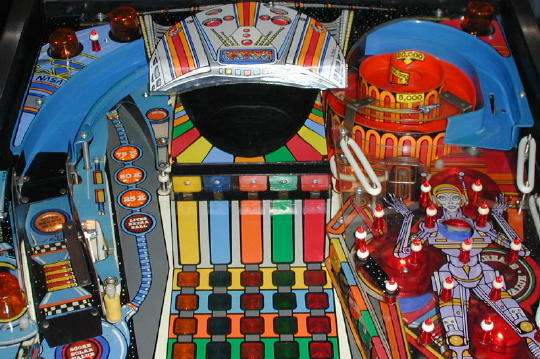
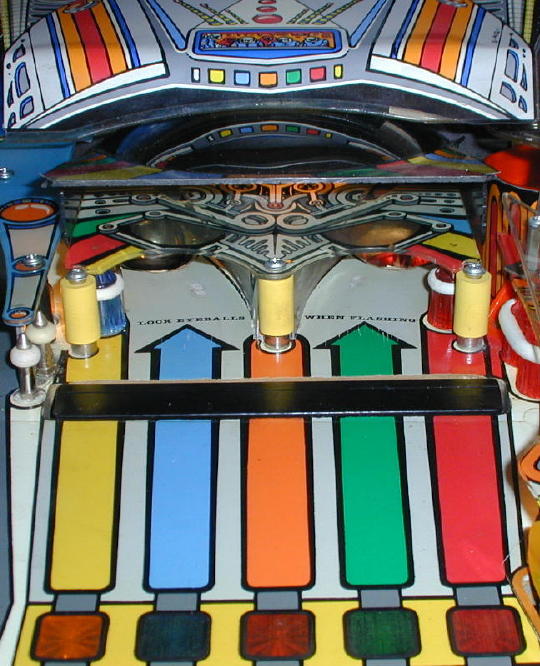
Chest Panel and Eye Eject holes: The center of the playfield is dominated by a colorful 5x5 matrix of lights and targets. A pair of "eye eject" holes are located at the top center of the playfield, but are initially hidden by Pin*bot's visor and the bank of five stationary "teeth" targets. Each of these teeth targets corresponds to a respective column of the Chest Panel light matrix. There's also a second bank of five right-side stationary targets that are perpendicular to the teeth targets and located between the Chest Panel matrix and the Jet Bumpers. Each of these targets corresponds to a respective row of the Chest Panel light matrix. Each hit on one of the teeth targets activates two lights in a respective column of the matrix. Each hit on one of the right-side targets activates two lights in a respective row of the matrix. After all 25 of the Chest Panel lights are lit, Pin*bot's visor rises and the entire teeth target assembly sinks into the playfield to expose the two eye eject holes. The current ball can be locked in either hole. After the current ball is locked a second ball is served. After the second ball is locked, two-ball Multi-Ball commences. When two or more people are playing, each person maintains their own progress on the Chest Panel. However, once a ball is locked, it stays locked until Multi-Ball commences. Thus it's possible to "steal" someone else's lock. Each hit on a target scores 2k points per light lit. Once all the lights are lit in a respective column, the teeth targets score nothing. Once all the lights are lit in a respective row, the right-side targets score 500 points per hit. Activating all five rows a second time lights an extra ball. Before any of the Chest Panel lights are activated, a player has one opportunity to open the visor immediately by hitting the target corresponding to the flashing row or column. Hitting the flashing row or column also scores 50k points.
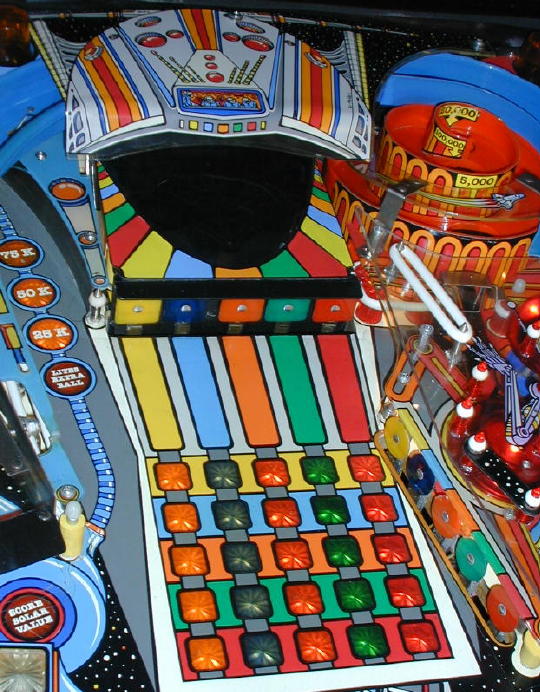
The Chest Panel and Visor.
Multi-Ball: Both balls are released from the eye eject holes and all playfield scores are doubled. The object of Multi-Ball is to collect the Solar Value (see ramp section above) by first re-locking one ball in either eye eject hole and then shooting the lit ramp with the other ball. The ramp remains lit for 20* seconds. If the Solar Value is not collected within the allotted time, the first ball is ejected and must be relocked for another attempt at the Solar Value. Once collected, the Solar Value resets to 100k points and the first ball is ejected, however a player may repeat the process of collecting the 100k point Solar Value until one of the balls is lost.
The open Chest Panel and Visor (first ball locked on left).
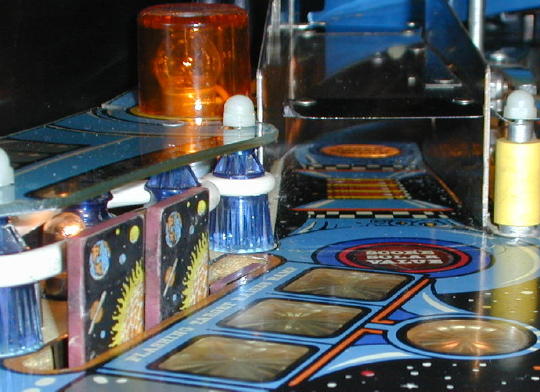
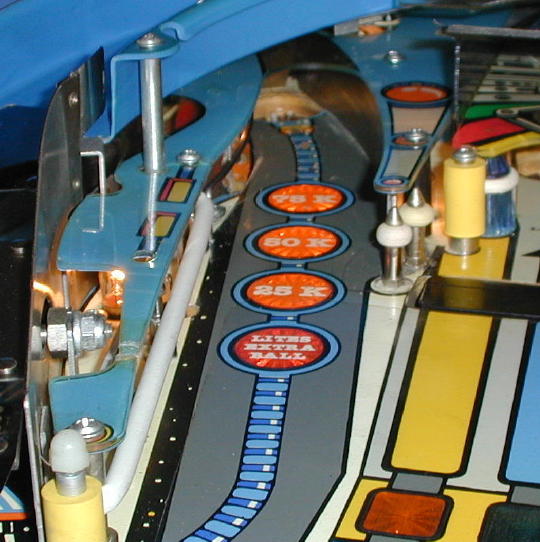
Upper Left Eject Hole: A single eject hole is located in the upper left corner of the playfield and may progressively score 25k points, 50k points, 75k points and "Lites Extra Ball". Hitting the right inlane flashes the initial value of 25k points. Hitting the eject hole lights and collects the 25k points. Another roll through the right inlane flashes 50k points and so on until a lit extra ball is achieved. Lit extra balls are collected from the inlanes and outlanes. When not lit, the eject hole scores 10k points. The eject hole feature carriers over from one ball to the next.
The eject hole.
Drop Targets & Planets: A bank of three drop targets is located at the left middle of the playfield. Completing all three drop targets within 15* seconds scores 25k points and advances to the next planet starting from Pluto. At the beginning of a game, Pin*bot selects a destination planet (usually Jupiter*). Reaching the destination planet scores a special. Reaching the sun scores 200k points and lights the bullseye target for an additional special. Planets may also be advanced via the bullseye target as described below. Each lit planet scores 20k points at the end of each ball. Lit planets remain lit from one ball to the next. Drop targets reset if not completed within the allotted 15* seconds. The flashing drop target scores 5k points and lifts the ramp to collect the Energy Value (see Jet Bumper section above). Unlit drop targets score 1k points.
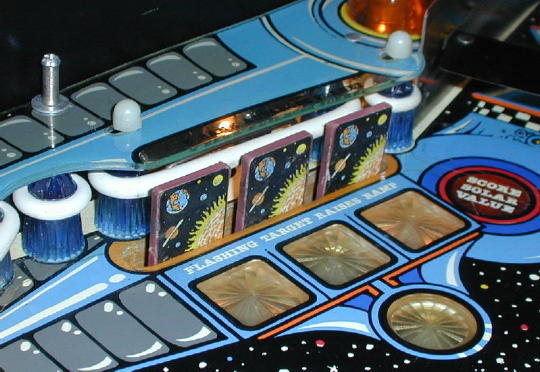
The drop targets.
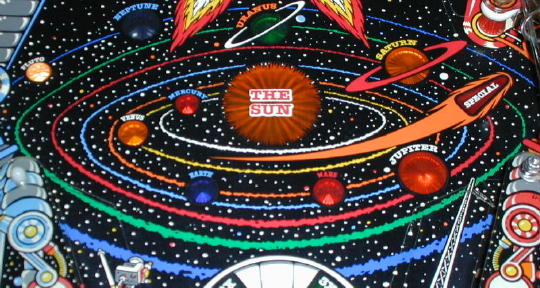
The solar system.
Bullseye target: The bullseye target is located on the right side of the playfield above the right outlane. The left inlane lights the bullseye target to advance the planets starting from Pluto. At the beginning of a game, Pin*bot selects a destination planet (usually Jupiter*). Reaching the destination planet scores a special. Reaching the sun scores 200k points and lights the bullseye target for an additional special. Planets may also be advanced via the drop target as described above. Each lit planet scores 20k points after the end of each ball. Lit planets remain lit from one ball to the next. The bullseye is worth 5k when not lit and scores zero points when lit. Planets may also be advanced via the drop targets as described above.
The bullseye.
Slingshots: The slingshots are of the usual shape and location and score 10 points per hit. The slingshots also toggle lit extra balls between the inlanes and outlanes. Several other rebound switches around the playfield (as well as the ramp entrance switch) score 10 points and toggle the extra ball lights.
Inlanes: Both inlanes score 5k points and award an extra ball when lit. The left inlane also lights the bullseye target as described above. The right inlane also flashes the upper left eject hole as described above.
Outlanes: Both outlanes score 20k points and award an extra ball when lit.
Flippers: There are two flippers in the usual location. There's also a fixed center post. Balls headed SDTM should just be left to bounce back into play on their own.
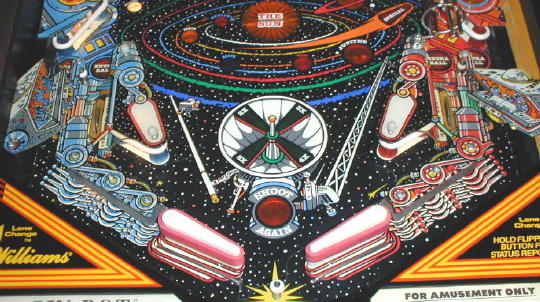
The lower playfield.
Extra Balls: Extra balls are collected via lit inlanes and outlanes. Lane change is available from the flippers. Extra ball lights are also toggled by the slingshots and other playfield rebound switches. More than one extra ball may be lit at a time. An extra ball is lit by completing the upper left eject hole feature as described above. An extra ball is lit by completing the right-side stationary targets for a second time as described above. As a consolation, an extra ball may be lit on the last ball if the player's average ball time is 35 seconds or less and no other extra ball or shoot again lights are lit. Each lit extra ball remains lit until collected or the games ends.
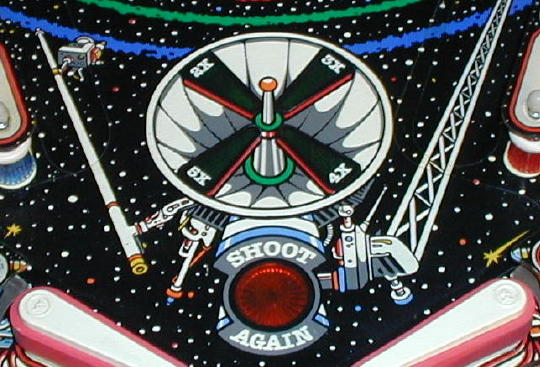
End-of-Ball Bonus: The end-of-ball bonus increases by 1k points for each of the following: start of ball, ramp shot, each Chest Panel light, upper left single eject hole, each drop target and each inlane. Outlanes are worth 3k points. Each ramp shot advances the end-of-ball bonus multiplier. The multiplier is displayed within a satellite image located in the middle lower playfield. After the end-of-ball bonus is added to the score, the Planet Bonus is added to the score in the amount of 20k points per lit planet.
Specials: Two specials are available by way of advancing the planets. See the above descriptions of the drop targets and bullseye target.
Sun Strategy: Reaching the sun represents a tradeoff. On one hand, 200k points are scored, the bullseye target is lit for a special and Pin*bot informs you that "We control the universe" (pretty damn cool!). On the other hand, the planets are reset, which represents a loss of 180k Planet Bonus points at the end of each ball. Over the course of a 5 ball game, that could add up to a potential sacrifice of around 900k points.
Tutorial: Press the start button with no credits on the game and Pin*bot runs through all main features. Each playfield feature flashes while a brief description appears on the score displays. It's a neat little sound and light show.
Pin*bot Vocabulary:
"Pin*bot circuits activated" - start of game
"Energy transferred" - Energy Value collected
"I am in your control" - completion of Chest Panel lights
"Partial link-up" - after first ball is locked
"Now I see you" - after second ball is locked
"Shoot for solar value" - after a ball is relocked during Multi-Ball
"We control the universe" - after sun is reached
"Million activated" - after 10x is reached on the Vortex
"Tilt - All data lost" - tilt