
The Gameroom

The gameroom is always evolving. Things come and go. After more than 20 years, there isn't much organization to this page. Consider it a random collection of ideas. The gallery of pictures below is from around the end of 2022. Click any thumbnail for larger image. Read on for some earlier pictures and an explanation of how it all started.


Click above thumbnails for larger image.

Click image to view a brief YouTube video walkthrough from 2024.
In the beginning... Around 2004 we moved to our new home featuring a 2,000 sqft walkout basement. Perfect for pinball. After several years of construction I had an 800 sqft finished space for a dedicated gameroom with mini-kitchen.


The mini-kitchen (a.k.a. the adult beverage and snack center).

Belle was in charge of gameroom security, parts cleaning and ping–pong ball retrieval.

Scruffy was in charge of exploring open coin doors.

Smokey's in charge of warming bar stools.
The retro bar table and stools were from Bars and Booths (www.barsandbooths.com). For a touch of '80s arcade decor I added a "Space Voyage" blacklight rug under the table. At first I wasn't sure how to light the rug with all the other ambient room light. Then I decided to add blacklights directly to the underside of the table. I used four F15T8–BLB florescent blacklight tubes. The effect was just what I wanted. The fixtures were wired together and the main cord was routed down through the table pedestal. Although the fixtures required only two-conductor power cords, I used a three-conductor main cord and grounded all the metal table parts.

Retro bar table and stools from Bars and Booths.


The patterns were Red Glacier Boomerang and Red Cracked Ice.

"Space Voyage" blacklight rug.

Under table blacklight fixtures.
Sixteen years later in 2026, I wanted to increase my seating capacity. Bars and Booths was still in business, so I ordered another identical table set. In 16 years, their prices had more than tripled, but I guess that's how it is. I got a bigger rug to fit under both tables. Fluorescent tubes were no longer a thing, so I went with LED blacklight bars. They were so much brighter, I retrofitted the old table.
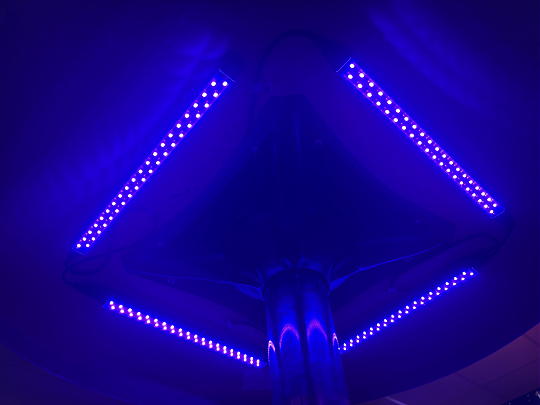
Under table LED blacklight fixtures.
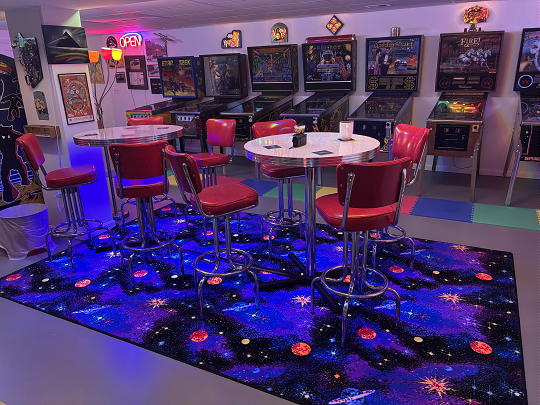
New rug and table arrangement.
I put the old rug over in front of the serving table. I couldn't think of a great way to light it, so I made up a portable LED blacklight bar that can hang from the knobs of the HVAC closet.
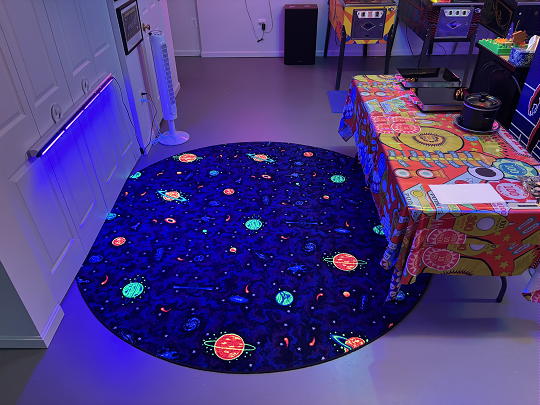
Old rug, new location.
Lights and other Doo-dads...
I racked my brain trying to come up with a creative color scheme for the gameroom. But I ended up with plain white walls and ceilings. Maybe I'll do some painting someday. But for now I decorate with colored light. General lighting is provided by several chrome bathroom light bars fitted with colored compact spiral fluorescents. The bulbs have an interesting shape and provide some mellow color without much power and heat. The light bars are an efficient alternative to an expensive collection of neon. I found racks of these bathroom fixtures for $5 to $15 at Habitat for Humanity stores.


Bathroom light bars for gameroom lighting.
Update: I've done some rearranging and things now look a little different from the pictures above. I finally settled on a lighting scheme after a few years of tinkering. There's a soffit running the length of the room and I found I could mount lights on the sides of the soffit without causing glare on any pinball playfield glass or backglass. Shorter people see a bit of glare at the top of the backglasses, but it's not too bad. Altogether I have three eight-bulb light bars on each side of the soffit for a total of 48 spiral fluorescents in red, yellow, green and blue. I don't know how to get decent pictures of the effect. In real life the color and shape of the bulbs are plainly visible and there's a neat alternating color effect down the center of the room. Yet the colors combine to light the games in a more even white. Overall the room might be a bit brighter than what most people would prefer for a gameroom, but I like it that way.

Bathroom light bars for gameroom lighting.

Bathroom light bars for gameroom lighting.

Here's a flipper wall plate for a light switch. Click for construction information.

An illuminated stained glass Penn State logo. Click for more information on this piece.


A fake neon "OPEN" sign from Home Depot and a real "PINBALL" neon.

"Yuengling" neon.


Octopus floor lamp and gumball machine.
Here's a Hi-Tec Art Cube, a 64 color LED matrix. It runs about 30 minutes before repeating any pattern. I was on the fence about this (it's not cheap) until I read about quadrupling its apparent size with a pair of mirrors. Check the video below.

Hi-Tec Art Cube.

--EXTERNAL LINK-- Click image to go to YouTube video of the Hi-Tec Art Cube with mirrors.
I thought about constructing a pub shelf around the gameroom's central column. Instead I simply ordered some teak drink holders from a boating supplier.

Teak drink holders.

The "pinball junk" Christmas tree. Click image for larger picture.

Now with star post garland. Click image for larger picture.

Click for more info on the Disco Drink Table.

Click for more info on the Pneumatic Can Crusher.

Click for more info on the animated Cylon wall hanging.

Click for more info on my homemade backlit wall hangings.

Click for more info on the steampunk lava floor lamp.

Click for more info on the RGB illuminated booze bottle box.
I found an old digital picture frame in the bottom of a junk drawer. I loaded it up with a few hundred Bally and Williams game flyer images and turned it into a gameroom wall decoration. It wasn't designed to do portraits so I had to drill a vertical mounting hole and pre-rotate the images. And the wood part of the frame was too chunky and "living room looking". So I ripped it down and painted it. It automatically goes to slideshow upon power up. It's plugged into a switched outlet and starts running with the rest of the room lighting. The slideshow runs for about 45 minutes before repeating.

Digital Picture Frame.
Here are some old electronic items I got from my father-in-law (who worked for Bell back in the day). The meter on the right requires AC power and runs on vacuum tubes. The phone is plugged in and works. I don't know anything about antique telephones, but it appears to be cobbled together from different parts. The wood box with the ringer is clearly not original. It all makes for an interesting gameroom display.

Antique meters and telephone.
The basement also has a man-friendly bathroom. I always wanted my own urinal.

Background Music Videos
Back in the 1980s, if you walked into an arcade, bar or shopping mall, you'd likely see televisions with MTV playing in the background. I wanted to recreate that atmosphere.

Click for more info on the music video project.
Electrical
The gameroom is powered from six outlet circuits. There are three unswitched circuits for games. There are three switched circuits for lamps and neons. I settled on the convention of double boxes distributed along the walls at four foot intervals. The left-side white outlets are unswitched. The right-side ivory outlets are switched and correspond to a bank of three ivory switches near the room's entrance.


Switches and outlets.
There's also a system of 2'x4' florescent ceiling fixtures when bright light is needed.

Big lights.
Since there are no windows in the basement, I added a battery-powered emergency light. It simply plugs into a wall outlet and turns on when the power goes out.

Emergency lights.